Saturday, April 20, 2024

7 Things You Need To Know About Propane Safety - DOUBLE DUTY RV RANCH PARK (RV Park Decatur Texas TX)


Important Propane Safety Tips For RVers


It’s hard to find anyone who doesn’t use propane as part of their RV experience. Propane gets used in RVs for cooking, refrigeration, and heating.  Outside of the RV, propane has a host of other uses like firing up the barbecue or propane fireplace.  The use of propane is so common, it’s easy for RVers to take propane safety for granted. 

Propane is a colorless, odorless gas that is compressed into a liquid.  Since propane is a highly noxious gas that can kill quickly if a leak goes undetected, gas companies add a rotten egg smell to it. This smell helps us detect propane leaks before they can poison us. When handled correctly, propane is a stable, safe, and convenient fuel.

1. Know what to do if you smell gas.

If you already smell the rotten egg smell of a propane leak in your RV, here’s what you should do: 

  1. Extinguish all flames and turn off indoor valves like the one on your stove.
  2. Turn the propane cylinder valve off.
  3. Leave the area of the leak immediately. 
  4. Be aware that propane is heavier than the air we breathe.  Being closer to the ground, children and pets are more vulnerable to propane’s toxic effects than adults. 

2. Always store and transport propane tanks secured in an upright position.

In its compressed liquid state, propane is stored in metal propane cylinders.  All propane cylinders are designed with a safety relief valve that will cause propane to leak out if the liquid propane inside comes into contact with the valve.  This leaked propane vaporizes immediately and the resulting vapors could either ignite or cause propane toxicity.   

Secure your tanks for use and transport them using the harnesses that come with your rig.  If you need to take portable tanks in for a fill-up, secure them in the back of your pick-up truck using a milk crate, tie-downs, or a propane stabilizer.

3. Store and transport propane outdoors.

Don’t store or transport propane tanks inside your RV or your vehicle.   If you have to take them for a refill, transport your propane tanks secured in the back of a pickup truck.  This is for two reasons:

  1. If there is a propane leak inside your vehicle, you could die or be trapped in a fiery inferno.
  2. If you are in an accident and firefighters attend, they will be focused on getting you and your family out of your vehicle.  They’ll be using all the tools they need to do that.  If they don’t suspect there is a propane tank inside your vehicle, a spark from a metal cutting tool could be disastrous. 


Propane-related accidents can be catastrophic and are avoidable. Make sure you are on a safe route by planning your travels with RV LIFE Trip Wizard; you can simply select propane and RV-friendly routing options under the Routing & Driving tab to be automatically routed around tunnels that prohibit propane.

4. Keep propane valves turned off during travel.

One of the most hotly contested topics among RVers is whether you should run the fridge on propane during travel.  On one side, there are RVers who passionately say they do it all the time without issue.  On the other side, there are some RVers who don’t want to risk it all for keeping their food and beverages cold.  

The fact is, when we are traveling on highways and gravel roads with our rigs, they are subjected to shaking that can be equivalent to that of an earthquake.  The parts of the propane system that make it function can theoretically be damaged during movement.  All it takes is a small spark or your RV refrigerator’s flame and you could be standing by the side of a highway, inhaling the carcinogenic fumes of your burning RV or worse.   

The trick to avoiding this ugly and unexpected scene is to simply keep your propane valves turned off during travel.  Your RV fridge is designed to keep its contents cold for a few hours even if it’s off.  For longer trips, you can always store cold food and beverages in a cooler, and then store them in the RV fridge when you get where you are going. 

5. Keep propane cylinders cool.

Keep propane cylinders in a cool place. Don’t expose them to heat above 120 degrees F.  At 120 degrees, propane can start leaking or even combust. 

On really hot days, it won’t hurt to use Reflectix, aluminum shade cloth, or even ice to help keep your propane tanks cool.  Given the high flammability of propane, it’s a good idea to always keep propane cylinders away from flames.

6. Propane cylinders should be replaced when necessary.

Propane cylinders have a useful lifespan of 10 years in Canada or 12 years in the USA.  There is a stamp on the collar of the tank that will give you the date of manufacture so you can tell how old it is. 

In addition, propane cylinders should be carefully checked for excessive rust, corrosion, and wear and tear.  Out of date or worn out propane cylinders can often be returned to anywhere that sells propane. 

7. Inspect valves and hoses and regulators for leaks frequently.

Your entire propane system should be inspected at least once per year.  It’s best to get a certified RV technician to do this, but there are a few components close to the cylinder that you can easily check yourself and swap out if necessary.  You can easily check them by spraying soapy water on them and watching for bubbles.  by Lynne Fedorick 

  • RV BASICS
  •  RV LIFESTYLE


    Friday, April 19, 2024

    DOUBLE DUTY RV RANCH PARK (Decatur TX RV Park) - RV Mold and Mildew Removal Tips and Tricks


    Here’s what you need to know about RV mold and mildew removal. 


    Mold growing on the outside of an RV is not a pretty sight. It commonly attacks camper canvas on awnings, and sometimes RV mattresses get mold and mildew if condensation in the camper is really bad.
    If mold and mildew grows on the inside of an RV, the fungus spores can worsen existing allergies and asthma for anyone inside.

    Exterior RV Mold and Mildew Removal Tips

    Fortunately, we’ve never dealt with this specific problem—likely because we tend to park in sunny places—but we’ve had plenty of friends with mold growth stains on their RVs.

    From what we’ve learned, RV mold and mildew prevention (and removal) is easy to deal with if you know what you’re doing. Here’s what you do.

    A Recipe to Remove Mold from Exterior Walls

    Is there mold growing on the outside walls of your rig? Sometimes just cleaning the RV as part of your normal RV maintenance will take care of the problem. When you do, we recommend this chemical-free recipe for a DIY RV mold and mildew remover.

    Mix one gallon of hot water with a cup of powdered dishwashing soap and a cup of white vinegar, or a splash of detergent.
    Use this to wash your rig and it’ll soon be good as new. 

    How to Clean Mold from an RV Roof

    Let’s say the mold and mildew is on the roof rather than the walls. In this case, you will need to be careful what you clean with, as not all cleaning products are safe for rubber roofs.

    Should You Use Bleach to Clean RV Roof Mold?

    Most people recommend using a solution of warm water and a splash of bleach. The EPA does not recommend bleach for routine household mold removal. Instead, a regular detergent or white vinegar tends to be a more effective mold killer, is safe to use on an RV roof, and is generally safer for people and animals, too.

    Removing Mold from an RV Awning

    Do you need to tackle the task of removing mold or mildew from the RV awning? This is another instance where the hot water and vinegar mixture should do the trick.

    • Use a long-handled brush to scrub wherever mildew stains appear, then rinse well.
    • You’ll also want to make sure you allow the awning to dry completely before rolling it back up, as the RV mold and mildew are bound to grow back if you don’t.


    Tuesday, April 16, 2024

    WHY RV SEWER HOSE SUPPORTS ARE A MUST-HAVE: IMPROVING SANITATION & STABILITY


    Can you guess the RV accessory that is often left off of “must-have” lists but is, in fact, a must-have? RV sewer supports! Sure, you can live without them, but these simple pieces of RV equipment really do come in handy.

    Here are all the reasons you really should invest in an RV sewer hose support, as well as what to look for as you’re shopping for one. 

    WHAT IS AN RV SEWER HOSE SUPPORT?

    Not even sure what an RV sewer hose support is? Also known as sewer hose ramps, these simple contraptions do exactly what the name suggests: They sit under your RV sewer hose and…well, support it.

    Not only do these ramps lift the “stinky slinky” off the ground, but they also hold it at a slight angle so that water drains easily from your wastewater tanks into the sewer. This is more helpful than you might imagine. 

    WHY AN RV SEWER HOSE SUPPORT IS IMPORTANT

    Still not convinced you need an RV sewer hose support? We hear you. Some campers actually do go years without investing in RV sewer hose supports. That said, they do offer some pretty great benefits. 

    Here are a few of the reasons you might want to buy a support for your sewer hose.

    GET THE HOSE UP OFF THE GROUND

    A sewer hose coiled up outside of your camper is a recipe for disaster. Just imagine what might happen if someone were to trip over the thing and dislodge it from where it should be.

    Getting the hose up off the ground lowers the risk of someone tripping over it. It also helps keep the outside of the hose free of the mud, dirt, and grass that tends to stick to a hose sitting on the ground for an extended period.

    DRAIN TANKS MORE EFFICIENTLY

    Yes, your wastewater tanks will manage to drain whether or not you have a support under your sewer hose. That said, they will drain more quickly if you have a support holding the hose at a slight angle all the way to the sewer hookup. It also helps to have a sewer hose support holding the end of the hose at the level of the sewer hookup if it happens to be sticking up out of the ground. 

    AVOID SEWER HOSE BUILDUP

    You know what happens inside the sewer hose when it’s sitting on the ground? Water sits in there. Unfortunately, this means that any debris in the water will often stick to the sides of the hose. Depending on what exactly the debris is, it can be very difficult to wash off, especially if it’s halfway down the hose where a stream of water from a hose can’t reach easily.

    Having a steady incline from your RV to the dump point helps the wastewater flow where it needs to go rather than sticking around inside the hose.

    MEET CAMPGROUND REQUIREMENTS

    Lastly, it’s important to note that some campgrounds actually require campers to use RV sewer hose supports. In some cases, this is even a city-wide rule, meaning that moving to another campground in the same area may not mean you can go without a hose support, regardless of whether their rules specify it.

    Because of this, we recommend buying a sewer hose support now so you have it when you need it. 

    WHAT TO LOOK FOR IN AN RV SEWER HOSE SUPPORT

    Ready to buy an RV sewer hose support? You might want to know what exactly you should be looking for. In our opinion, there are five important attributes to keep an eye out for when searching for the perfect RV sewer hose support:

    1. Length
    2. Portability
    3. Durability
    4. Functionality
    5. Price

    Obviously, you will want to make sure your sewer hose support is long enough for your sewer hose. You will also want something portable enough to fit easily into your storage bay and durable enough to last a long time.

    Of course, you will also want something that does its job well without buckling under the weight of the hose or wandering out from under it. Lastly, it’s important to consider the price of any support you buy. 


    Monday, April 15, 2024

    Here’s What To Do When Your RV Smells Like Sewer - Decatur TX RV Parks - DOUBLE DUTY RV RANCH PARK


     Unlike a house where the toilet, shower, and sink detritus can be flushed or washed far and away, an RV carries its waste around inside its belly, sometimes for days or weeks at a time. During this time, odors from whatever went down the drain can creep back up into the RV living space. This makes for some unpleasant conditions on an otherwise pleasant trip.

    An RV grey tank is usually the less likely culprit when it comes to smells. The grey tank is the holder of water from sinks and showers. However, soap scum, hair, food waste, and a moist environment can release moldy odors from the grey tank or sinks into the RV.

    The best way to get rid of a grey tank smell is to make sure that no food goes down the kitchen sink, use a holding tank treatment, and regularly empty the tank at a dump station.

    But what if there are still lingering odors? Why does my RV smell like sewer?

    The main culprit of sewage odors will be your RV black tank.

    The smell that needs to be dealt with immediately is the stink caused by a much worse effluent. If you are going to use your RV toilet for both Number 1 and Number 2, knowing how to clean out and maintain your black tank is an essential RV skill.

    An RV black tank is usually located in the underbelly of the RV. It contains water, waste, and toilet paper from an RV toilet. Emptying and maintaining a black tank is probably one of the most dreaded jobs of any new (or veteran) RV owner.

    Don’t worry. Once you take a little time and get the hang of it, making sure the tank is healthy should keep any odors away from your RV life. The tips below should help. Consequently, if you have a smaller RV that combines the grey and black tank into one, you can also follow these tips below.

    1. Prevent RV tank clogs

    Preventing any clogs is the first step to maintaining a healthy tank. The best way to do this is to avoid putting anything but RV-safe toilet paper down the toilet. If you can handle it, don’t even put your toilet paper down the toilet at all. Instead, do what they do in areas with sensitive plumbing and put it in the garbage.

    If you do have a clog, this excellent post by Camp Addict has a step-by-step process to clean out the tank from the dreaded pipe clog or the poop pyramid.

    2. Keep plenty of water in the tank

    Preventing tank clogs and odors will go much smoother if the black tank always has plenty of water in it. Waste from the toilet needs to be mixed with fluids so that the tank and the solids within it don’t dry out and cause odors. There are several ways to do this.

    One way is to make sure to flush after each use of the RV toilet. Adding a little more water down the toilet drain is also useful if your…um…deposit was generous. In addition, the rule of thumb for adding water into the tank is to make sure that the bottom of the tank is completely covered with water. You can monitor this on your black tank sensor or make sure you flush down about four to six tanks of fresh water from the toilet.

    3. Empty the tank before it gets full

    To avoid odors even further, make sure that when you empty your black tank, you do it before it gets full. This will require another monitoring of the black tank sensor. You should plan to dump your tank at around the 3/4 full mark since this will allow for one or two extra flushes before the tank actually fills to the brim.

    At the time you are dumping the black tank, this is also a good time to do a good, if not thorough, clean of the tank. This excellent video by RVgeeks shows not only how to empty and scrub out a black tank, but also how to do a “sniff test” using your bathroom vent fan:

    4. Regularly clean and maintain the toilet gate valve

    There is really only one simple part that keeps odors from wafting up into your RV bathroom and that’s the RV toilet gate valve. It’s imperative to keep this valve (or flapper) clean and in good repair. The seal around the valve is also an important part in that it holds a small amount of water at the bottom of the toilet. This water will hold back any smells that linger in the toilet or the tank.

    If the toilet gate valve is dirty, it may not close and keep that seal tight. Take a wet rag and thoroughly wipe around and under the valve to remove any debris. This is also a good time to check the valve seal for cracks.

    5. Keep your tank’s gut happy

    Just like your tummy, your tank is happier when full of enzymes. One of the best products for both tank treatment and odor control is Happy Campers RV Holding Tank Treatment. The treatment is a blend of minerals and micronutrients that both treats waste and eliminates odors without perfumes. One scoop will work for a 40-gallon black tank, and the product will also work fine in your grey water tank.

    Hopefully, this article helps you answer the question, “Why does my RV smell like sewer?” Make sure you keep track of all your RV maintenance and repairs with an online tool such as RV LIFE Maintenance. Not only can you keep all of your documents in one place, but you’ll also receive timely reminders when maintenance is due to help you avoid costly repairs and potentially serious accidents.


    DOUBLE DUTY RV RANCH
    Wise County's Best Kept Secret!


    Sunday, April 14, 2024

    4 Pro Tips to Extend the Life of RV Trailer Tires - RV Park Decatur TX DOUBLE DUTY RV RANCH

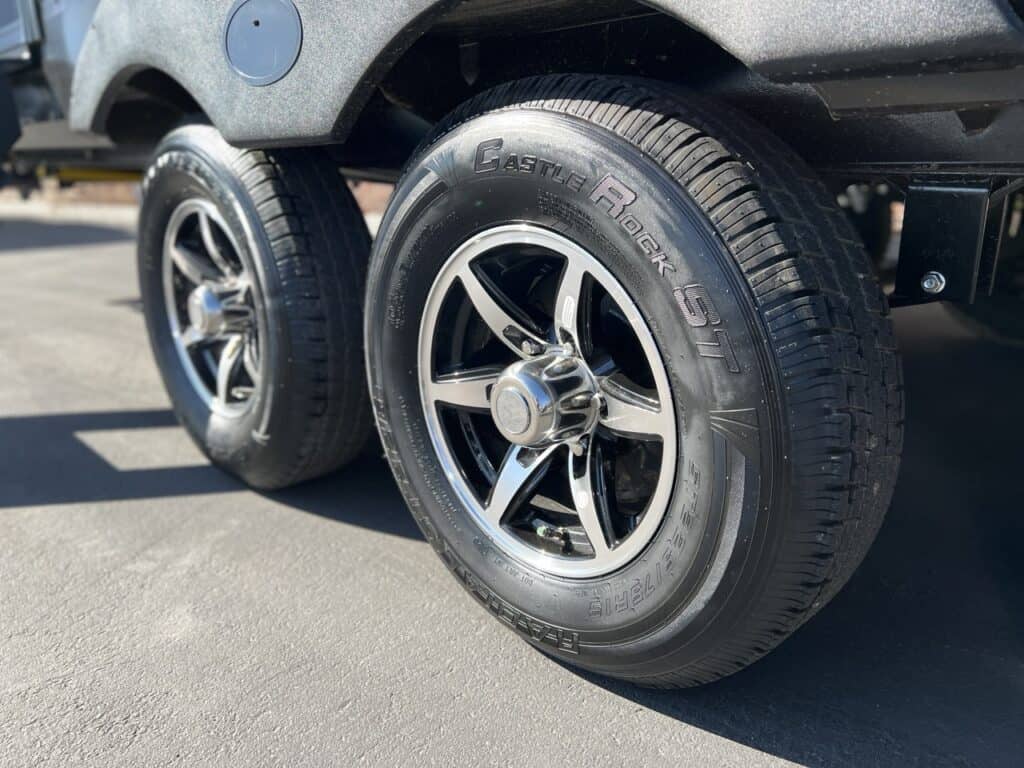
     Proper RV trailer tire maintenance leads to healthy, happy tires. Photo: Bruce Smith.

    Proper tire pressures and tire selection can save the day!

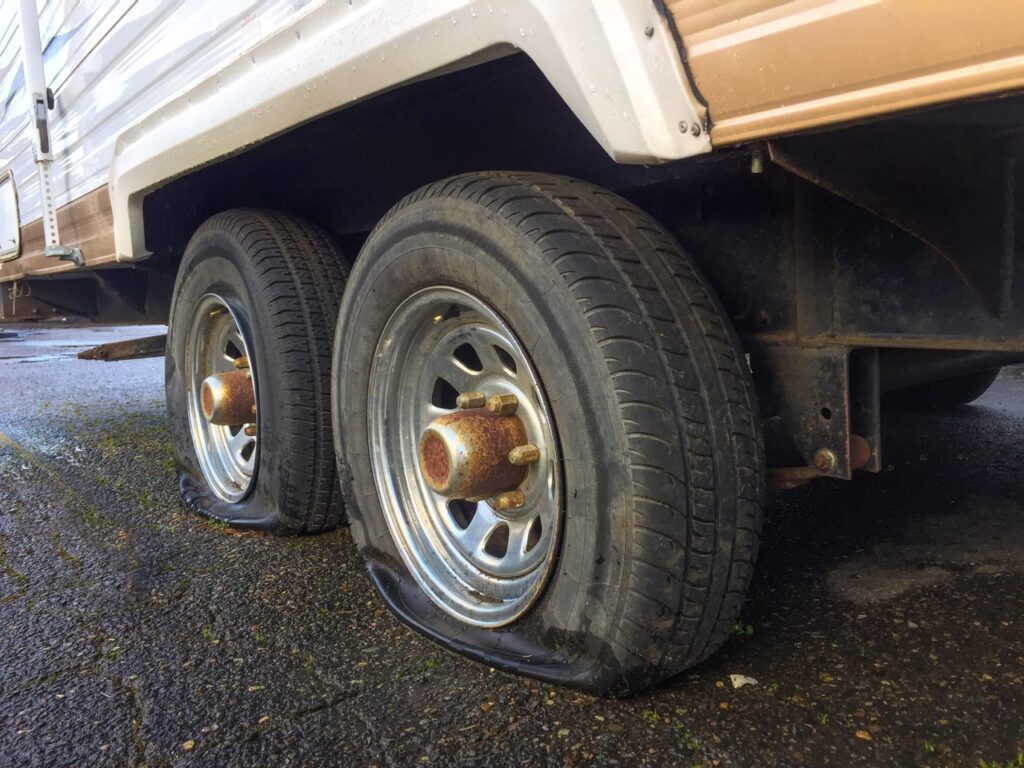
    An RV trailer tire fail will instantly put a big damper on what would otherwise be a fun, relaxing outing. Swapping out the damaged tire on the camper with the spare not only takes time, it means incurring the added expense of having the flat repaired or replaced. 

    Paying close attention to your RV trailer’s tires before hitting the road is the best way to prevent such roadside repairs and unexpected replacement costs.

    There are multiple factors that can cause a trailer tire failure. It can be the age of the tire, or damage caused by punctures by an object. Perhaps it’s running the wrong air pressure, or you hit a curb or a pothole. Finally, mixed tire types/sizes, or carrying too heavy a load for the tire can cause failure. It could also be a combination of any or all of the above.  

    There’s not much you can do to prevent a trailer tire being punctured. But the other contributors to RV trailer tire failure are easily addressed. 

    Proper RV Trailer Tire Inflation

    Maintaining proper trailer tire inflation is critical to tire integrity. Over- and under-inflation of trailer tires are the leading causes of blowouts and failures according to RV tire manufacturers and tire dealers.

    To find the proper inflation, weigh the fully loaded coach on all four corners at a certified Cat scale to get the weight of the RV on all the tires. Then use this information and inflation tables from the manufacturer of the tires on the RV to determine how much to inflate them.

    “Proper inflation is essential to everything we ask tires to do,” says TJ Campbell, the Tire Information & Testing Manager for Tire Rack. “If it has to be one or the other, it’s better to be overinflated than even one-pound underinflated. Underinflation can quickly lead to tire failure, reduced tread life, decreased fuel economy, and more. It’s one of the most common causes we see when handling customer concerns over blowouts and other forms of failure. 

    “Trailer tires should be inflated to the maximum cold-air pressure indicated on the sidewall,” says TJ. “Tire pressures should always be checked with an accurate digital gauge before the trailer hits the road—or after the tires have cooled down.”

    How Often Should You Check?

    Under-inflated, over-inflated, or over-loaded tires can’t properly grip driving surfaces. This leads to poor handling, vehicle instability, and heat build-up in the sidewall and tread area—all of which cause the tire’s structural components to break down and can lead to tire failure. 

    Static travel trailer and RV tire inflation pressures should be checked at least once a month. “Generally, that will be the max inflation for the tires’ load range, which is listed on the sidewall of the tire,” says TJ. “That’s 50 psi for load range C (6-ply rated), 65 psi for load range D (8-ply rated), and 80 psi for load range E (10-ply rated).

    If the tires are in use, check them before you hit the road and prior to leaving the campsite. It doesn’t take much effort to check every day you plan to travel. The trade-off for those few minutes is well worth it.

    Matching Trailer Tires 

    Another contributing factor to trailer tire failures is mismatched tires. This is a common issue on older trailers where the owner, or previous owner, only replaced one or two tires and didn’t bother to make sure they were exactly the same size, brand, and load rating as the others. 

    The trailer’s tires should have a load carrying capacity (rating/range) at least 10-percent greater than the trailer’s gross vehicle weight rating (GVWR). Again, weigh the trailer (or motorhome) at a certified CAT scale when loaded down for a trip to avoid overloading.

    Making sure the trailer tires are the same on all axles is very important to tire longevity. Mismatching will place added pressure on the tire(s) supporting the load.  

    Tire and RV manufacturers recommend that if one tire on a tandem- or triple-axle trailer fails due to some factor other than a simple puncture, it’s best to replace all the tires on that side. That’s because they were probably subjected to excessive loading before that one tire failed.

    Tire Age

    A dual-axle travel trailer with flat tires due to improper tire maintenance. Photo: Bruce Smith.

    Age is another factor that contributes to a trailer tire failure. Unlike the tires under tow vehicles or passenger cars that wear out from mileage, trailer tires usually succumb to age.

    The general consensus among trailer tire manufactures is to replace the tires every 3–5 years. Of course, their goal is to sell tires. A good rule of thumb is that tires age out after 7 years. And that’s even if they appear to be in good shape.

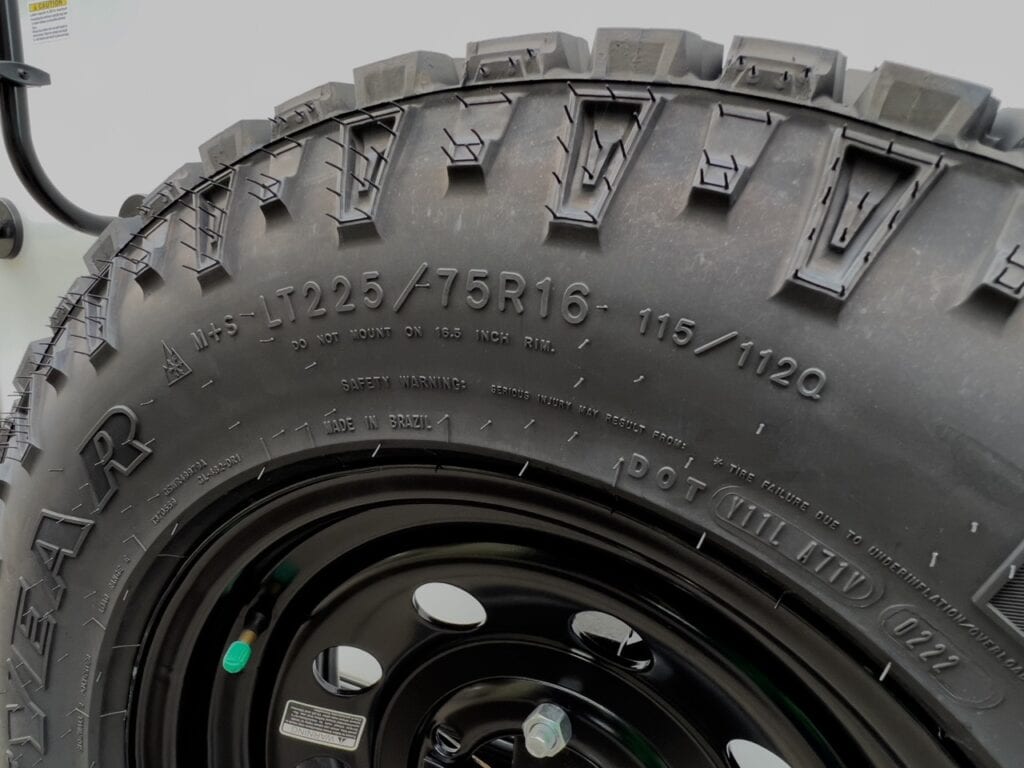
    If you want to check the age of a tire, locate the Department of Transportation (DOT) tire identification number (TIN). This is a string of numbers that is imprinted on the tire’s sidewall. The numbers represent the tire manufacturer/plant code, the tire size code, the manufacturer’s internal code, and the date the tires were made. The date is noted in the last four digits. The first two represent the week of the year they were made. The last two depict the year they were manufactured.

    The sidewall of a tire showing how to find the date of manufacture. Photo: Bruce Smith.
    This tire was manufactured the second week of 2022, according to the TIN in the lower right of the image. Photo: Bruce Smith.

    Other Factors

    In the real world, a lot of variables go into “How old is too old” for an RV trailer tire. There are more than two dozen components that make up a tire, and not all age at the same rate.

    • Heat is the biggest tire killer. If a trailer spends most of its life in the weather conditions of the hot desert southwest, the tires could have a 2–3-year shorter life expectancy than ones under the same trailer used in milder climates. 
    • How the tires are maintained and stored also makes life difference in a tire’s service life. As noted earlier, improperly inflated tires have a shorter life than those running the recommended air pressure. 
    • Leaving the tires exposed to the sun’s harmful UV radiation also plays a role in service life. If tires are exposed to too much UV damage, they can become weak and cracked.
    • Then there’s driving style. Trailers towed by more aggressive drivers will have a shorter lifespan than those subjected to more docile tow vehicle drivers. That’s due to side loading and heat from the brakes.

    In general, travel trailer tires should be replaced every 5–6 years, with close inspection every year before and after each camping season. Your results may vary and may require more frequent replacement. Goodyear has a great reference guide on the topic of RV tire life. 

    Trailer Axle Alignment

    Another factor that can lead to shortened RV tire life and failure is alignment. This is especially true for newer trailers with independent suspensions. It’s also especially true for solid-axle trailers that are subjected to a lot of off-pavement travel. A suspension that’s out of alignment will cause excessive tire wear.

    “A trailer or fifth-wheel suspension just 1/4-inch out of alignment over 5,000 miles is the equivalent of dragging your RV sideways for 125 miles,” say service experts at Camping World.

    Henderson’s Line-up in Grants Pass, Oregon, does a lot of travel-trailer and motorhome alignment work. “It’s surprising how many customers we get that come in because they were having tire wear issues,” says Tommy Henderson. 

    “Believe it or not, trailers can also be affected by incorrect axle alignment. We’ve even seen triple-axle trailers where each of the axles was misaligned. And settings such as toe and camber were out of spec as well. Putting the trailer on the alignment rack to bring everything back into spec solved the problem,” Tommy tells us. He adds, “We recommend that trailer/fifth-wheel alignment should be checked every couple years—sooner if you see edge wear on the tire or tires.”

    The bottom line with trailer tires, and RV tires in general, is with proper selection, maintenance, and inspection, any RVer should get the maximum service life out of them and avoid costly roadside tire repairs.